While bulbs planted outdoors are just getting out of their winter naps, garden shops and grocery stores have greenhouse bulbs that are a little ahead of schedule. I love bringing these bulbs indoors, en masse, to enjoy the beauty of spring inside and a little earlier than Mother Nature planned.

These common looking plastic pots of hyacinths, daffodils and crocus can be transformed into a lovely meadow of blooms and will last for weeks indoors.

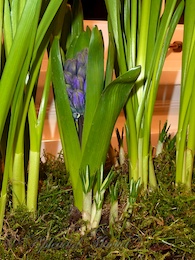
Each one of these tight green hyacinth buds is just waiting for a little warmth and sunshine to burst open with fragrance in color, by keeping them in the warm indoors, you can “force” them to open up more quickly.

The delicate crocus blossoms enclosed in these white and green tubes are ready to reach for the sun and unfold with just a little hint of few cozy rays.

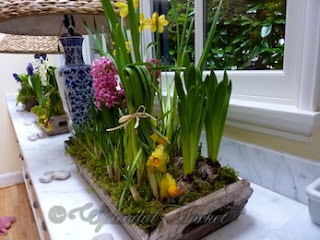
I decided to use these rustic wooden trays, the sides are just under 3 inches tall, enough space to hold the bulbs and some soil. Lining the containers with foil will protect them from the soil and water.

After taking the soil mass from the pot, I separated and reconfigured the bulbs to fit them into the tray attractively.
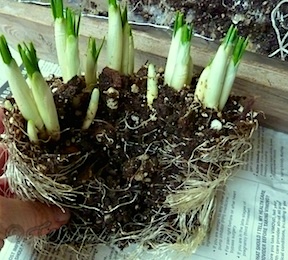
The beauty of bulbs is that they are pretty hearty and self-sufficient. They will not complain if you separate them into clumps, tear a few roots apart, trim a few more.

As long as they have their nutrition source attached (the bulb), and a little water, the flowers will happily reach for the light, bloom and grow. Allow for at least an inch of soil under the roots. I nestled the bulbs atop the soil and gently spread out their roots for stability.
Planting flowers in uneven numbers looks more natural and pleasing to the eye.

While working with the bulbs, I tried to keep the tops as clean as possible by gently dusting or misting them. It’s nice to see the clean tops of the larger bulbs above the soil.

Once the bulbs were in place I covered the soil with small clumps of moss, living in the Northwest, this moss is right out my back door. Moss can be bought at floral shops as well — if you use dried moss be sure to soak it in water before topping your soil. Instead of moss you could use stones, shells or twigs to cover the soil, or, just leave it natural.

Since these trays do not have drainage I water them every day or two using a mister or by just putting some ice cubes on the surface.
Each day your bulbs will open a little more,

blooming and growing and filling your home with their heady fragrance.
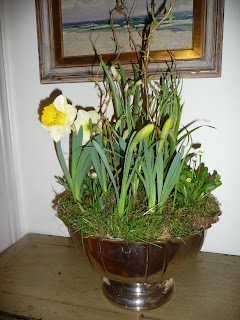
Even indoor gardens do need to be tended from time to time {it’s kind of fun}! My daffodils were the first to bloom, when they were finished, I folded them over and tied them down with twine to let the newer blooms prevail.

I love my multiple tray display — it looks like an expansive meadow of blooms in my kitchen.
Almost any container would work (see more examples below) …look around your abode, what can you fill with a little bit of Spring??
I hope you’ll try this, I think you’ll love having a close-up preview of of the sights and smells of Spring indoors.


Please send images if you do!!
To see how to make some of the indoor bulb gardens we’ve done in the past, click on the titles below.
 |
| Indoor Garden Splendor |


How beautiful and creative!! I can almost get a lovely whiff of those hyacinths!! I wish I was better with plants – I love how they look and smell but sometimes you just have to admit when something isn't your strong suit!
i love these… i have these flowers everywhere… in the store, at home… they make me so happy!
next week drinks or dinner? thur?
have a great weekend… xx
I haven't seen bulbs around here quite yet, but you've inspired me (again!) to find some! Happy weekend to you!
I haven't seen bulbs around here quite yet, but you've inspired me (again!) to find some! Happy weekend to you!
Rustic beauty filled with life and the promise of spring, what could be better after a long winter?
beautifully put, tabitha, thank you.